


Get in touch for free quote
RV Polishing & Oxidation Removal in Edmonton: Step-by-Step Process
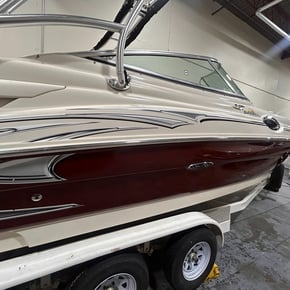
At Auto Master Solution, we specialize in high-end RV polishing and oxidation removal services tailored for Edmonton’s harsh weather conditions. Whether your RV is parked year-round or used for seasonal road trips, we restore its original gloss and protect it from UV rays, acid rain, and grime buildup.
Below is a detailed breakdown of our proven 5-step RV polishing process used on motorhomes, campers, trailers, and fifth wheels of all sizes.
✅ Step 1: Decontamination Foam Pre-Wash
The first step in any successful RV polishing job is preparing the surface. We begin with a decontamination foam bath using a high-foaming, pH-balanced cleaner. This removes:
Road salt
Bug splatter
Bird droppings
Industrial fallout
Our mobile units are equipped with pressure washers and foam cannons to loosen embedded dirt without scratching the surface.
We also clay bar affected areas if we notice heavy contamination on fiberglass or gelcoat panels.
Brands we use:
P&S Pearl Auto Shampoo
Gtechniq W6 Iron & Fallout Remover
Clay Magic Clay Bars
📍 This step is critical for RVs stored outdoors in Edmonton’s winter and spring climates.
✅ Step 2: Oxidation Removal Using Heavy-Cut Compounds
RVs are prone to oxidation, especially on white fiberglass surfaces and darker painted exteriors. Oxidation makes the surface dull, chalky, and faded.
We remove up to 95% of oxidation using professional-grade compounds including:
Zephyr PRO-25 Easy Kut
Renegade Wicked Cut Compound
Zephyr Heavy Duty 4-Layer Polish
These are applied with rotary machines using aggressive wool pads to cut through the oxidized layer safely.
Our team carefully monitors panel temperatures and works section-by-section to avoid swirl marks or holograms.
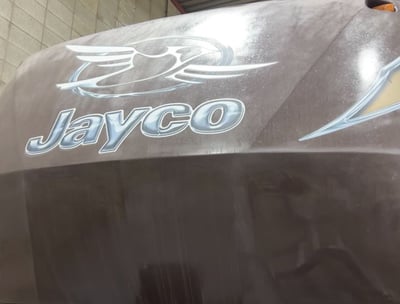
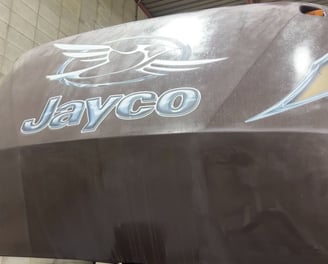
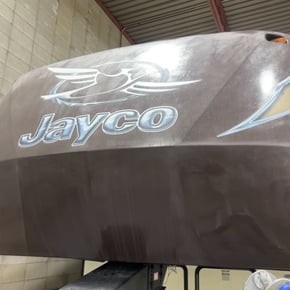
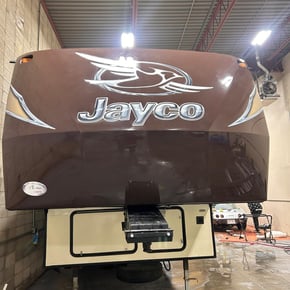
📍 Example: We recently restored a 36-ft Jayco RV stored near Fort Saskatchewan, where oxidation was particularly bad on the roofline.
✅ Step 3: Machine Polishing with Rotary & Wool Pads
Once oxidation is removed, we refine the finish with a multi-step polishing process. We switch to softer wool or microfiber pads depending on the surface material (gelcoat, clearcoat, aluminum siding).
This step brings back the depth, gloss, and clarity of your RV’s finish.
Products used include:
Zephyr PRO-40 Metal Polish
Griot’s Garage One-Step Sealant
3D Speed AIO Polish
In this step, we focus on polishing:
Full body panels
Wheel wells
Roof rails
Ladder frames
Aluminum trims
📍 Polishing is especially important before applying wax or ceramic coating — otherwise you seal in imperfections.
✅ Step 4: Wax or Ceramic Coating Application (Optional Upgrade)
We offer protection tailored to your needs:
🧴 Option 1: Carnauba Wax
A great choice for seasonal travelers. Adds 3–6 months of gloss and UV protection.
🧪 Option 2: Ceramic Coating
For long-term protection, we recommend Gtechniq Marine Ceramic Coating, which lasts up to 2 years on gelcoat or aluminum surfaces.
Benefits:
Extreme hydrophobic properties
Easier cleaning between trips
No chalky fading
Reduced maintenance effort
📍 Popular with snowbirds and full-time RVers in Alberta
✅ Step 5: Final Inspection & Delivery
Before completing any job, our lead technician performs a panel-by-panel inspection under LED lighting. We:
Remove polish residue
Dress tires and trims
Clean glass and mirrors
Inspect roof and edges for missed spots
You’ll receive a full walk-around and care instructions for maintaining your finish.
📍 All work is backed by our “Shine Satisfaction Guarantee” – if you’re not happy, we’ll come back and fix it.
🏁 Why Choose Auto Master Solution for RV Polishing in Edmonton?
✔️ Fully mobile – we come to your home, storage yard, or campground
✔️ Professional compounds and equipment
✔️ RV-safe ladders and scaffolding for tall units
✔️ Experienced in Class A, Class B, and trailers
✔️ Competitive pricing with upfront estimates
YOU MAY ASLO LIKE
Highly rated service provider for all your auto needs inn and around greater Edmonton
What's inside: new arrivals, special discounts, news and more!